All guides
- 1. Install and get started
- 2. Batch images and videos on Google Flow
- 3. Auto download and history
- 4. Remove logos from images and videos
- 5. Install Mark Bridge and turn on the Flow API
- 6. Build and run workflows
- 7. Use ChatGPT, Gemini, Grok and Muse
- 8. Prompt and creative tools
- 9. Plans, upgrades and payment
- 10. Control Mark Flow with an AI agent (MCP)
- 11. Mark Flow settings: what each option does
- 12. Troubleshooting
Guide › 4
Remove logos from images and videos
Remove the Google Flow and Gemini logo from the bottom-right corner of images and videos, right on your computer: with the Remove logo tab for files you already have, or automatically on every download with the Pro plan.
What this feature does
Images and videos made with Google Flow or Gemini carry a small logo in the bottom-right corner. Mark Flow looks for the logo in that corner and patches the logo area with the surrounding content. The rest of the image stays as it was; nothing is blurred.
The processing runs on your own computer, through Mark Bridge (the companion extension of Mark Flow). Your images and videos are not sent to the server.
- The Remove logo tab in the side panel cleans images and videos you already have on your computer. The Free plan can use it, with a daily limit.
- Removal on download: Mark Flow removes the logo while it downloads your results from Google Flow. Requires the Pro plan.
- Accepted files: PNG, JPG and WebP images and MP4 videos. Files that were cropped, resized or re-compressed may not come out fully clean.
Only remove logos from images and videos you have the right to use, and follow the Google Flow and Gemini terms.
Before you start
- A signed-in Mark Flow account (the Free plan is fine). No account yet? See the getting started guide.
- Mark Bridge installed and switched on. How to install it: Install Mark Bridge and turn on the Flow API.
- Original files downloaded straight from Google Flow or Gemini, not edited afterwards.
Quick Mark Bridge check: type chrome://extensions in the address bar and press Enter. If you see the Mark Bridge card with its switch on (blue), you are set.
Remove logos in the Remove logo tab
Open the Mark Flow side panel (the panel on the right edge of the browser; press
Alt+Sto open it). Click the Remove logo tab in the top row, next to Workflow. You see the Drop images here box.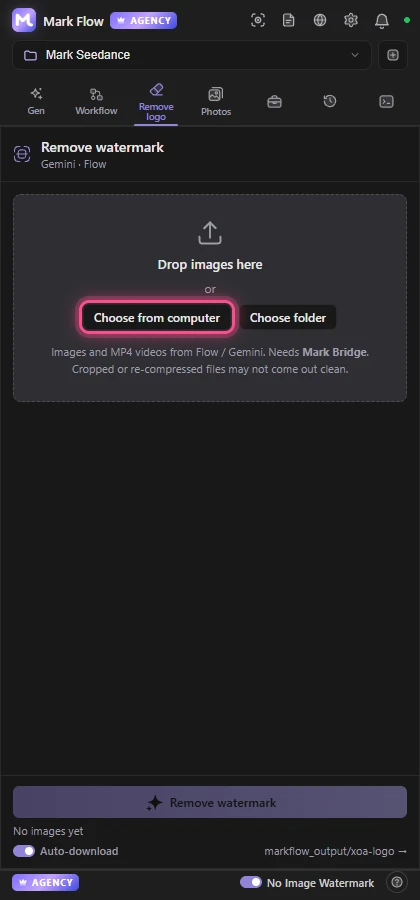
The Remove logo tab before any file is added. Add files: drag images or videos onto the box, or click Choose from computer. Paid plans also get Choose folder to add a whole folder, sub-folders included. Each file appears as a row labelled Waiting.
Click the big Remove watermark button at the bottom. The number in brackets is how many files are waiting, for example Remove watermark (3). Files are processed one by one; the running row says Processing. Videos take longer and also show Detecting watermark…, Merging audio… and Packaging…. To stop midway, click Stop.
Read the result on each row: Removed means done; Kept original (for videos Original clip kept) means no logo was found, so the file was left untouched; any other orange label is an error, see the last section.
Compare before and after (images only): click the small thumbnail at the start of a cleaned row (it shows an eye icon). A zoomed view of the bottom-right corner opens: Original on the left, Removed on the right. Drag the divider left and right to compare. Press
Escor the X button to close.Download: click Download on a row, or click the big button, which now reads Download all (n). Once every file is saved it reads All downloaded.
The Auto download switch at the bottom is on by default. While it is on, each cleaned file is saved right away and you do not need to click Download. The text next to the switch shows where files go, by default markflow_output/xoa-logo inside your Downloads folder. File names get a _clean suffix, for example cat-photo_clean.png. When you add a folder, its sub-folders are kept.
- The Include files that could not be cleaned switch appears after processing. Turn it on if you want Download all to also save the originals of files that could not be cleaned.
- The X at the end of a row (Remove from list) and the trash icon at the top (Clear all) only take files off the list; they never delete files from your computer.
markflow_outputis the main Mark Flow download folder. Rename it in Settings › Downloads & logo removal › Folder.
Free plan limits
The Free plan can use the Remove logo tab with the limits below. A reminder, Free plan: one file at a time, 30 images and 5 videos a day…, is shown right in the drop box.
| Limit | What you see |
|---|---|
| 30 images and 5 videos a day | The file row says You have used today's free logo removals (30 images, 5 videos a day). Upgrade for unlimited use. |
| One file at a time | If you pick several files, only the first one is added, with Free plan: one file at a time. Only the first file was added. |
| No whole folders | There is no Choose folder button. Dropping a folder shows Folders need a paid plan. The Free plan cleans one file at a time. |
These short notices appear in orange under the panel title for a few seconds. Pro and Agency remove logos without limits and accept many files and whole folders. See Plans and billing.
Automatic removal on download (Pro)
With Pro or Agency you do not need the Remove logo tab: Mark Flow removes the logo while it downloads images and videos from Google Flow. Turn it on in any of these places.
- The Gen tab: turn on Auto download and the No watermark switch appears right below it. When generating images it applies to images; when you switch to video (the video camera button, Generate videos), it applies to videos.
- The side panel footer: two small switches, No Image Watermark and Video.
- Settings › Downloads & logo removal › the Logo removal card, with the three switches in the table below.
| Switch | What it does |
|---|---|
| Images: remove the Flow logo on download | Every Flow image downloaded through Mark Flow is cleaned before it is saved. |
| Videos: remove the logo (adds 5–20 s per video) | The same for videos. Each video takes about 5 to 20 seconds longer. |
| Also remove the logo from input images before sending | Reference images you drop into a prompt are cleaned before they are sent to Flow. Mark Flow asks you to confirm when you turn it on; each image takes a few extra seconds. |
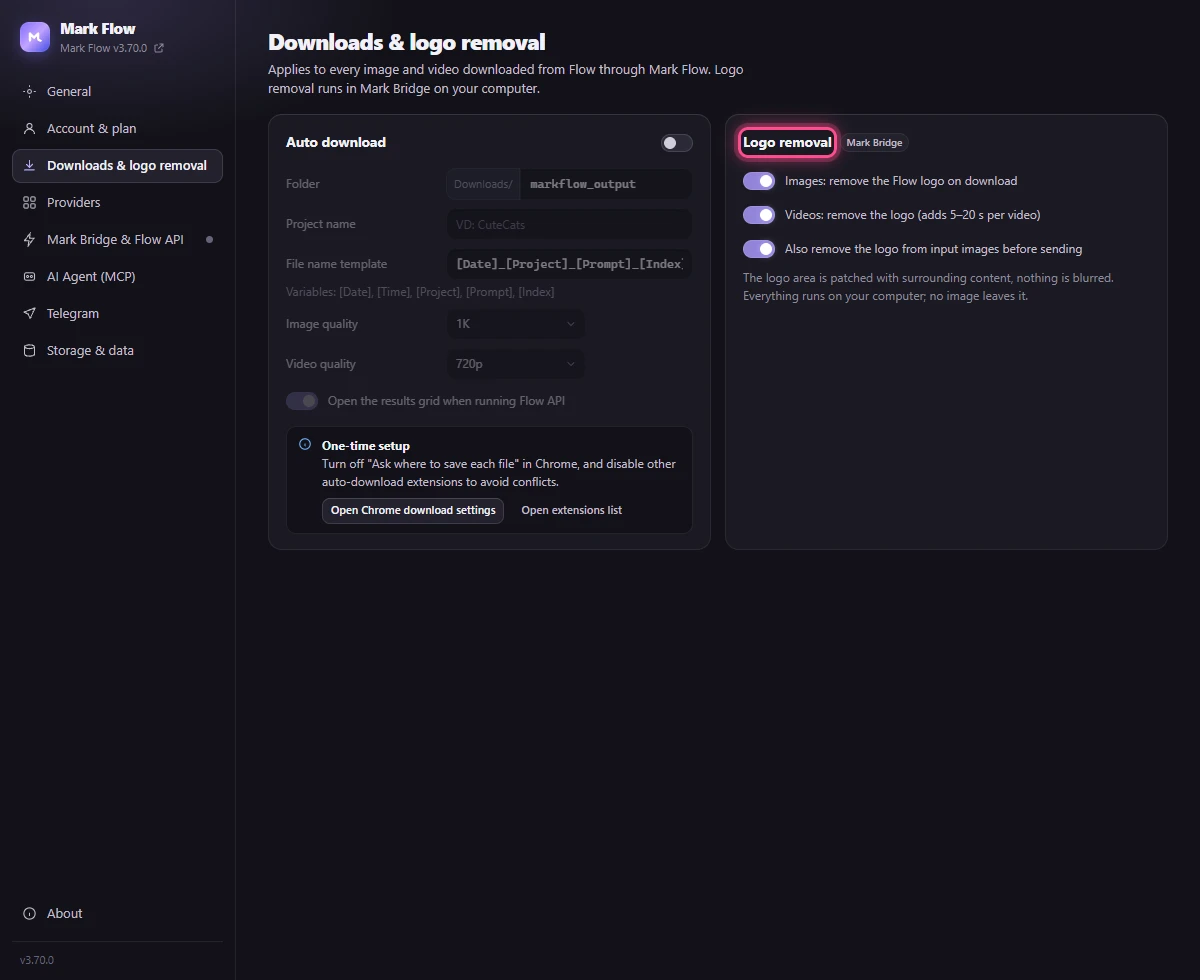
After changing switches in the Settings window, click Save changes in the top-right corner. On the Free plan these switches are locked and show Upgrade. For automatic downloads, see Auto download.
When a file is kept or shows an error
| You see | Cause and fix |
|---|---|
| Kept original, with no watermark found below the name | Mark Flow found no logo in the bottom-right corner, so it changed nothing. Hover over the row to see the match score. This usually means the image was cropped, resized, re-compressed or does not come from Flow or Gemini. Use the original file downloaded straight from Flow. |
| Every image says Kept original, even originals from Flow | Check that Mark Bridge is installed and switched on, and that you are signed in to Mark Flow. If either is missing, images are kept as they are instead of showing an error. |
| You have used today's free logo removals… | You reached the Free plan's 30 images or 5 videos for today. Wait until tomorrow or upgrade. |
| Feature is currently turned off | The feature is switched off on the server side. Try again later. |
| Cannot reach the server | Check your internet connection and try again. |
| Invalid file | The file is not a PNG, JPG, WebP or MP4. |
| A message that the clip is too large (300 MB limit) | The video is larger than 300 MB. Use a smaller file. |
For videos, when the logo cannot be patched, Mark Bridge may cut a thin strip off the bottom of the video (about 4% of its height) to remove the “Veo” text at the lower edge.
Still stuck? See Troubleshooting.
Still stuck? See Troubleshooting or email admin.markflow@gmail.com with your Mark Flow version, the AI platform and the exact error message.