All guides
- 1. Install and get started
- 2. Batch images and videos on Google Flow
- 3. Auto download and history
- 4. Remove logos from images and videos
- 5. Install Mark Bridge and turn on the Flow API
- 6. Build and run workflows
- 7. Use ChatGPT, Gemini, Grok and Muse
- 8. Prompt and creative tools
- 9. Plans, upgrades and payment
- 10. Control Mark Flow with an AI agent (MCP)
- 11. Mark Flow settings: what each option does
- 12. Troubleshooting
Guide › 8
Prompt and creative tools
Save and reuse prompts, give a whole batch one style, let AI write many prompts for you, import prompts from a file, save tasks, make camera angles and effects, and collect reference images.
Where the tools are
In the side panel (the panel on the right edge of the browser), click the grid icon Tools after the main tabs. The Tools board shows Prompts, Tasks, Angles, Effects and AI Agent (see AI Agent). Other tools sit right in the Gen tab: on the small button bar attached to the Prompt box, and the Style button.
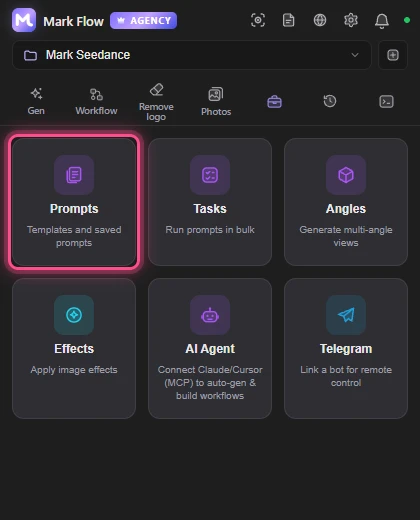
| Tool | Used for | Free plan |
|---|---|---|
| My Prompts | Save prompts you use often, with fill-in variables | Up to 20 prompts |
| Templates (in Prompts) | Ready-made prompt templates | Needs Pro |
| Style | Add a style description to every prompt | Up to 3 custom styles |
| Prompt Assistant | Turn an idea, a script or SRT subtitles into many prompts | Needs Pro |
| Import .txt | Load prompts from a .txt or .csv file | Available |
| Tasks | Save generation jobs to run again | 2 tasks, 1 run per day |
| Angles | Make several viewpoints from one image | Needs Pro (runs through Flow API) |
| Effects | Apply ready-made effects to an image | 1 run per day |
| Photos | Manage and find reference images | Available |
| Image to Prompt | Turn an image on the web into a prompt | Image analysis needs Pro |
The Free plan has the limits shown in the last column. See Plans and billing.
My Prompts and Templates
Open Tools › Prompts. At the top there are two sub-tabs: Templates (ready-made prompts, Pro plan) and My Prompts.
Choose My Prompts and click Add. The Add New Prompt dialog opens: fill in Title, Category (for filtering later) and Content, then click Save.
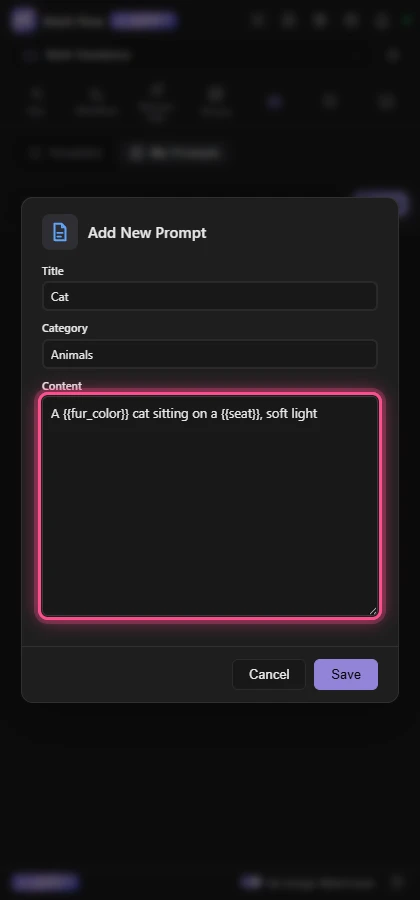
To leave a blank you fill in each time, write a variable in double curly braces, for example
A {{fur_colour}} cat sitting on {{seat}}. Variable names may only use plain letters without accents, digits and underscores.Click Use on the prompt you want. If it has variables, the Fill Variables dialog asks for a value for each one; type them and click Use. The prompt goes into the Prompt box of the Gen tab (replacing what was there).
Right in the Gen tab: the magnifier icon Search prompts opens your prompts and the templates for a quick pick; the Save current prompt icon saves what is in the Prompt box to My Prompts.
You need to be signed in to Mark Flow to save prompts. The Free plan saves up to 20 prompts.
Style
A style is a description (lighting, materials, art style…) added to every prompt when it runs, so a whole batch shares one look without you copying it into each prompt.
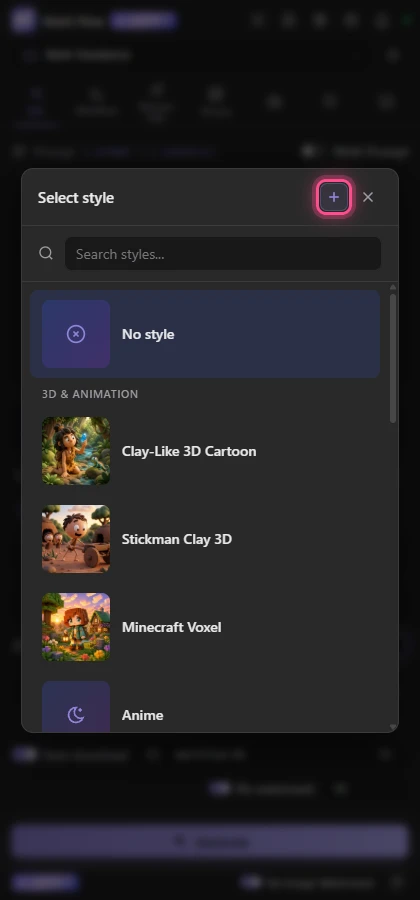
In the Gen tab, click the Style button on the settings bar. The Select style dialog opens, with a Search styles... box.
Click a style to pick it, or choose No style to remove it.
To make your own, click Create your own style (the + button at the top of the dialog, next to close), fill in Style name and Text added to the prompt, optionally add a Preview image, then click Save. Your styles appear under My styles.
The Free plan can create up to 3 custom styles.
Prompt Assistant: one idea, many prompts
Prompt Assistant asks ChatGPT or Gemini to write a whole batch of prompts from an idea, a script or an SRT subtitle file, then drops them straight into the Gen tab. It needs the Pro plan and a ChatGPT or Gemini sign-in in the same Chrome.
In the Gen tab, click the Prompt Assistant button on the small button bar attached to the Prompt box.
At Generate with:, choose ChatGPT or Gemini. If it says no tab open or not signed in, click Open tab and sign in.
Type an idea or topic, paste a whole script, or paste SRT subtitles (each subtitle cue becomes one prompt).
Choose Type (Image, Video or Image→video pair), Count, Language, and any other options you like.
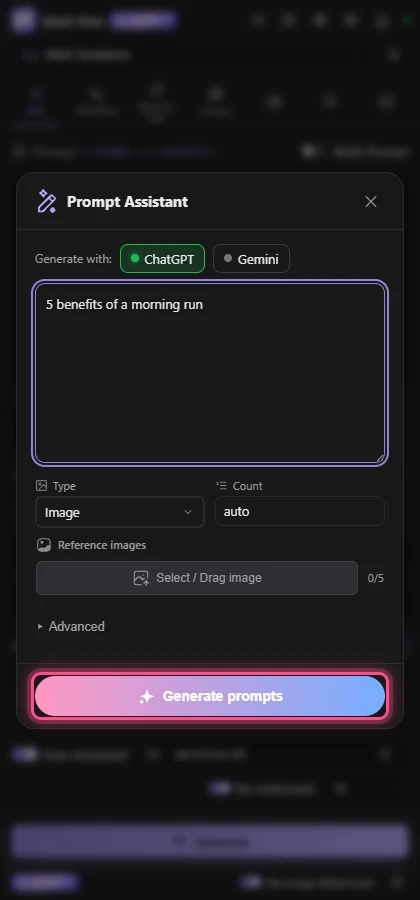
Click Generate prompts. The Generate with… dialog says Mark Flow will open the ChatGPT or Gemini tab and send the request for you; agree to continue, then wait for the answer.
When it is done, the list of prompts appears. Click Send to Mark Flow to drop the whole batch into the Prompt box of the Gen tab, or Copy to use it elsewhere.
On the Free plan, clicking Prompt Assistant shows a feature-locked message.
Import prompts from a .txt or .csv file
Write a text file (UTF-8) with one prompt per line. Lines starting with
#are notes and are skipped; empty lines are skipped too.In the Gen tab, click Import .txt on the small button bar attached to the Prompt box and pick the file. You can also drag the file onto the Prompt box.
Mark Flow adds the prompts to the end of the box (it keeps what is already there), separated by blank lines, and turns on Multi-Prompt when there are two or more.
A .csv file is read as plain text: each line is one prompt, and columns are not split. The Free plan runs up to 4 prompts per run (see Batch generation).
Tasks
A task is a saved generation job: name, prompts, platform, settings and reference images. Save it once, run it again any time, or run many tasks together.
Open Tools › Tasks.
Click Add, fill in the task the same way you use the Gen tab, and save it. The task appears as a card in the list.
The run-mode button on the toolbar switches between Parallel and Sequential.
Click Run All to run every task that is on and not yet completed.
You must be signed in to create tasks. The Free plan has 2 tasks and 1 run per day. When there is a ChatGPT task, a Grok task or a multi-prompt task, Mark Flow switches to sequential runs automatically.
Angles and Effects
Angles makes several viewpoints (front, side, back…) of the same subject from one source image. It runs through Flow API, so it needs the Pro plan, Mark Bridge and a Google Flow tab with a project open.
Open Tools › Angles. The Angles Editor window opens (its labels are in English).
Add the source image in Source image (click to choose or drag and drop).
Pick angles with the Front, Right 45°, Right 90°, Back, Left 90°, Left 45° buttons (you can pick several), or drag inside Orbit; fine-tune Tilt, Zoom and Strength.
Choose Prompt model (subject type), Shot, Model and Aspect ratio, then click ✦ Generate with Flow API. The results appear in the window; click Downloads to save them.
Effects: Tools › Effects opens a separate window with ready-made image effects grouped by category. You pick a reference image and an effect, Mark Flow builds the prompt and generates on Google Flow, so a Flow tab must be open. The Free plan gets 1 run per day.
Photos and Image to Prompt
The Photos tab in the side panel keeps your reference images (sample images sent with a prompt for the AI to follow). It has three sections:
- Album: keeps groups of reference images you reuse (create an album, give it an Album name, add images). Click Use on an album to put its images into your next generation.
- Flow Images: shows the images in the selected Flow project. Use takes an image as a reference, Download saves it, Refresh reloads the list.
- Search: type a keyword, then under Select channel to search: click a source (Pinterest, YouTube, TikTok, Google Photos, Facebook, Unsplash, Etsy, Pixabay, Amazon). Mark Flow opens that site's search page in a new tab.
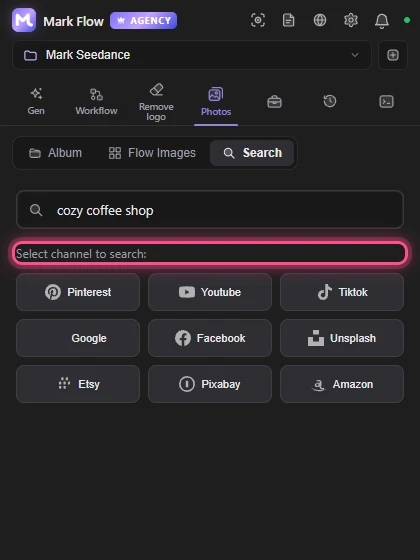
Image to Prompt: right-click any image on the web and choose Mark Flow · Image to Prompt:
- Analyze this image: opens the Prompt from image card on the page. Pick Analyze with: ChatGPT or Gemini, click Analyze, then Copy or Send to Mark Flow. Needs Pro.
- Send image to Generate tab: sends the image to the Gen tab as a reference image.
- Select region and analyze (right-click an empty part of the page): drag to select an area of the page to analyze. Needs Pro.
Still stuck? See Troubleshooting or email admin.markflow@gmail.com with your Mark Flow version, the AI platform and the exact error message.