All guides
- 1. Install and get started
- 2. Batch images and videos on Google Flow
- 3. Auto download and history
- 4. Remove logos from images and videos
- 5. Install Mark Bridge and turn on the Flow API
- 6. Build and run workflows
- 7. Use ChatGPT, Gemini, Grok and Muse
- 8. Prompt and creative tools
- 9. Plans, upgrades and payment
- 10. Control Mark Flow with an AI agent (MCP)
- 11. Mark Flow settings: what each option does
- 12. Troubleshooting
Guide › 10
Control Mark Flow with an AI agent (MCP)
Connect Claude Desktop or Codex to Mark Flow so you can simply ask the AI to generate images and videos for you: create a token, paste the configuration, test the connection and fix common errors.
What the AI Agent (MCP) is
MCP (Model Context Protocol) is a common “socket” that lets AI apps such as Claude Desktop or Codex use outside tools. Once Mark Flow is connected through MCP, the AI becomes an “agent” (an assistant that does the work): you just ask, and the AI sends the commands to Mark Flow.
For example, you tell Claude: “Make 4 images of an astronaut cat, 16:9, with Google Flow”. Claude sends the command to Mark Flow; Mark Flow runs it in your own Chrome, with your own Google Flow account, and returns the images to Claude.
Commands travel from the AI app through the Mark Flow server to the extension on your computer. Images and videos are made by your own Flow, ChatGPT, Grok or Gemini account, so they use your generations and credits. The feature requires Pro or Agency; on Free you see MCP requires the Pro plan. See Plans and billing.
Before you start
- A Pro or Agency plan, signed in to Mark Flow.
- An AI app that supports MCP. This guide covers Claude Desktop and Codex.
- For Claude Desktop: Node.js LTS from nodejs.org. The configuration uses the
npxcommand, which comes with Node.js. - On Mark Flow 3.70.7 and older: turn on the Flow API (needs Mark Bridge) or Run queue in batches in Settings › General › Advanced, otherwise Google Flow generation commands fail. From the next version the AI Agent runs through the queue on its own, nothing to turn on. See Install Mark Bridge and turn on the Flow API.
- Mark Bridge is recommended: images and videos returned to the AI have their logo removed by Mark Bridge.
Agent commands run through the Mark Flow extension on your computer. While the agent works, keep these open: Chrome, the Mark Flow side panel (the panel on the right edge of the browser, Alt+S) signed in with the account that created the token, and (when generating with Google Flow) a signed-in Google Flow tab inside a project. If any of them is missing, commands fail.
Create a token
A token is a secret string that tells Mark Flow the command comes from your AI.
Open the AI Agent (MCP) page: click the gear icon in the top-right corner of the side panel → Settings → choose AI Agent (MCP) in the left menu. Or, in the side panel, click the Tools tab → AI Agent.
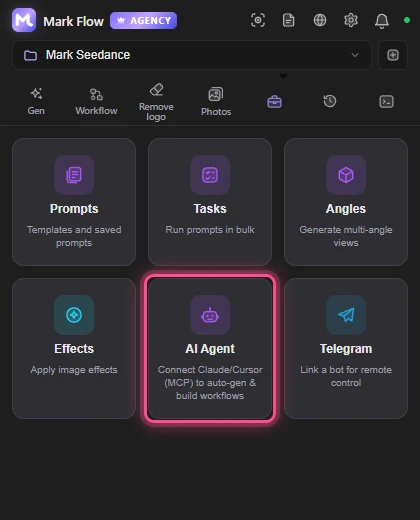
The AI Agent tile in the Tools tab opens the AI Agent (MCP) page directly. Type a name you will recognise in the field to the left of Create token, for example “work computer”, then click Create token.
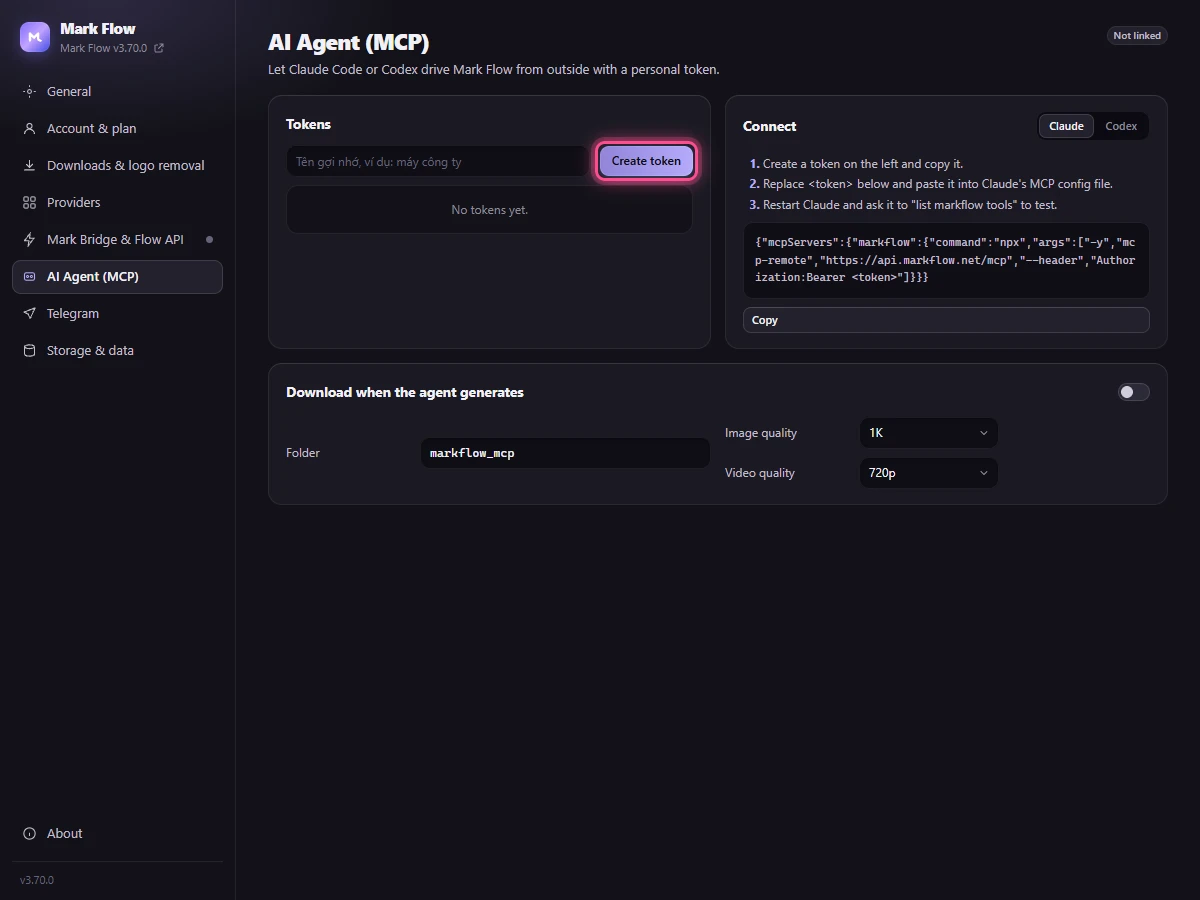
The name box and the Create token button on the token card. A green New token, shown only once box appears; the token starts with
mfm_. Click Copy right away and paste it somewhere safe for now, for example Notepad.The token appears in the list below with its name, never used or last used …, and its expiry date (one year later). The badge in the top-right corner of the page changes to the number of tokens you have.
Treat the token like a password: anyone who has it can drive your Mark Flow and spend your generations. Do not send it to anyone, paste it into group chats or show it in screenshots. If you lose it or it leaks, click Revoke next to it (any agent using it loses access) and create a new one. Each account can have up to 10 active tokens.
Connect Claude Desktop
Install Node.js LTS if your computer does not have it. To check: open Command Prompt (Windows) or Terminal (Mac), type
node --versionand press Enter; if you see a version number, you are set.Open Claude Desktop → Settings → Developer → click Edit Config. Claude opens
claude_desktop_config.jsonor the folder that contains it.Open that file with Notepad (Windows) or TextEdit (Mac). File location: Windows
%APPDATA%\Claude\claude_desktop_config.json, Mac~/Library/Application Support/Claude/claude_desktop_config.json.If the file is empty or only contains
{}, delete everything and paste the text below, then replaceYOUR_TOKENwith your token (keep the wordBearerand one space before the token):{"mcpServers":{"markflow":{"command":"npx","args":["-y","mcp-remote","https://api.markflow.net/mcp","--header","Authorization:${AUTH_HEADER}"],"env":{"AUTH_HEADER":"Bearer YOUR_TOKEN"}}}}Save the file. Quit Claude Desktop completely and open it again. Closing the window is not enough if Claude keeps running in the background: on Windows, find the Claude icon in the system tray next to the clock and choose to quit; on a Mac, press
Cmd+Q.Ask Claude: “list the markflow tools”. Claude answers with tools such as
generate_imageandgenerate_video. You can also see them under the + button in the bottom-left corner of the chat box › Connectors.
The Copy button under Connect › Claude on the AI Agent (MCP) page copies this configuration for you. In that copy, the part to replace is the word token between two angle brackets: replace the word and both brackets with your real token.
If the file already has content (for example another MCP server), do not delete it. Add the "markflow": {…} block inside the existing "mcpServers", separated from the previous entry by a comma; if there is no "mcpServers" yet, add it as a new entry. One missing comma or bracket makes Claude ignore the whole file.
Using Claude Code (the command-line version)? One command is enough: claude mcp add --transport http markflow https://api.markflow.net/mcp --header "Authorization: Bearer YOUR_TOKEN".
Connect Codex
Put the token in the
MARKFLOW_MCP_TOKENenvironment variable (a value your computer keeps for programs to read). Mac, Linux: open Terminal, runexport MARKFLOW_MCP_TOKEN='YOUR_TOKEN'and start Codex from that same window; add the line to your~/.zshrcfile so you do not have to type it again. Windows: open PowerShell, runsetx MARKFLOW_MCP_TOKEN "YOUR_TOKEN", then close and reopen the terminal window.Open the file
~/.codex/config.toml(Windows:%USERPROFILE%\.codex\config.toml) in a text editor. If it does not exist, create a new file with exactly that name.Add the four lines listed right after these steps at the end of the file, one per line. The easiest way: on the AI Agent (MCP) page, under Connect › Codex, click the Copy button below the configuration block and paste it into the file.
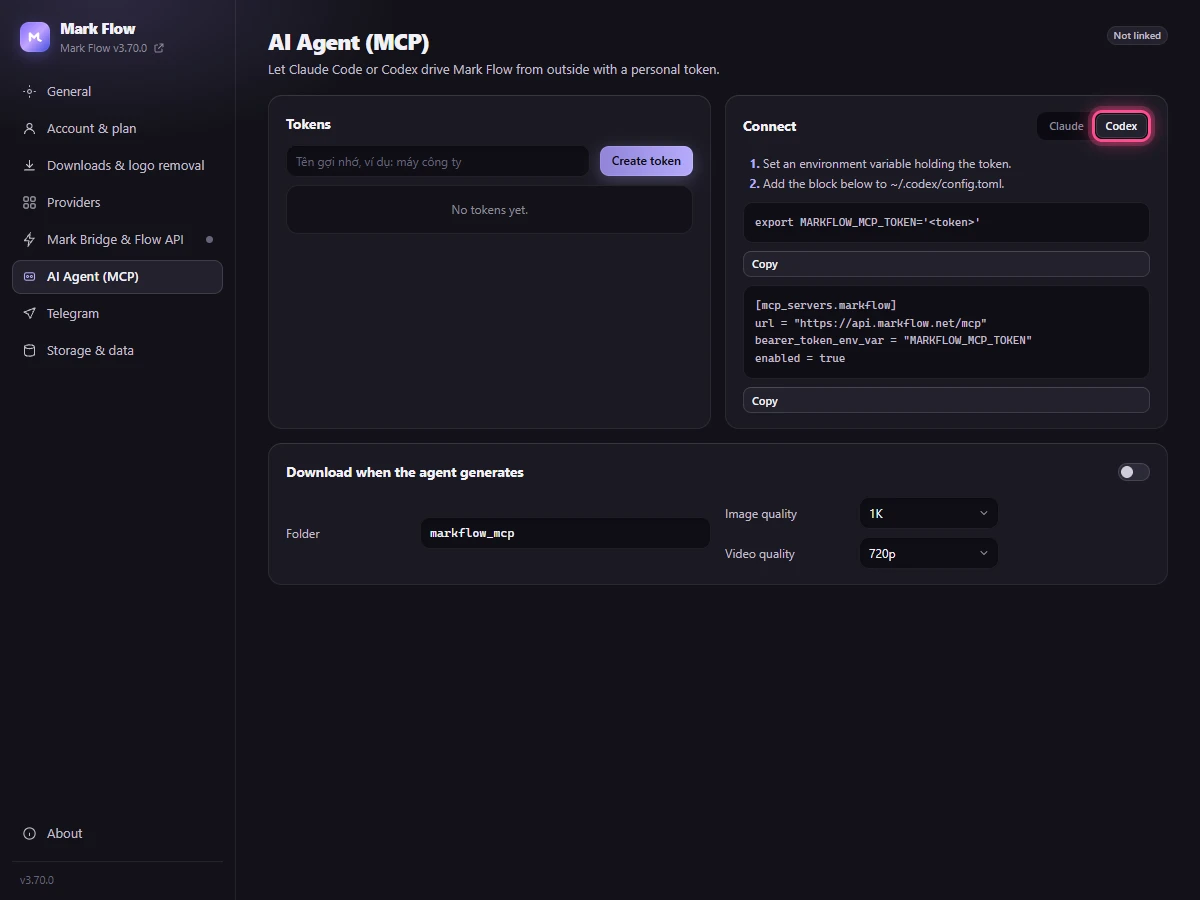
The Codex tab of the Connect card. Save the file and restart Codex. Run
codex mcp listor type/mcpin Codex: if you seemarkflow, it is connected.
[mcp_servers.markflow]url = "https://api.markflow.net/mcp"bearer_token_env_var = "MARKFLOW_MCP_TOKEN"enabled = true
The token is not stored in config.toml; Codex reads it from the environment variable. The Codex extension for code editors uses the same configuration file.
What the agent can do
| Tool | What it does |
|---|---|
get_status | Checks that Mark Flow is online (Chrome, side panel, right account), your plan and any running command. |
list_models | Lists the models you can use for Google Flow, ChatGPT, Grok and Gemini. |
generate_image | Generates images with Google Flow (default), ChatGPT, Grok or Gemini. Up to 10 prompts per call, up to 4 reference images per prompt. |
generate_video | Generates videos with Google Flow (Veo, Omni), Grok or Gemini. Up to 5 prompts per call; each video usually takes 1 to 5 minutes. |
get_job, cancel_job | Waits for the result of a running command, or cancels it. |
upload_reference | Uploads a reference image into the open Flow project. |
run_workflow | Runs a workflow you saved in Mark Flow. |
create_project, open_project, get_context | Creates or opens a Google Flow project, or tells which project is open. |
get_provider_status | Checks whether the Flow, ChatGPT, Grok and Gemini tabs are open and signed in. |
delete_chat | Deletes the ChatGPT conversation it just used. |
- You do not need to remember tool names: just ask in plain words, for example “Check whether Mark Flow is ready” or “Make an 8-second video of ocean waves at sunset, 9:16”.
- The first time, Claude Desktop usually asks whether the markflow tools may run; allow them.
- Results: images show up right in the AI's chat, with download links valid for 48 hours. Mark Bridge has already removed the logo.
- Each account runs one command at a time; the next one waits until the previous one finishes.
- Reference images: give the AI a public image link starting with
https://that opens without signing in. PNG, JPG or WebP, up to 12 MB. - Everything the agent makes shows up in the History tab with the label Generated via MCP (AI agent).
Save the agent's results to your computer
The Download when the agent generates card at the bottom of the AI Agent (MCP) page saves an extra copy of the results on your computer. It only applies to images and videos the agent makes with Google Flow.
Turn on the switch at the top of the card (off by default).
Folder: the sub-folder name, default
markflow_mcp. Files go inside the main Mark Flow download folder, soDownloads/markflow_output/markflow_mcpif you kept the defaults.Choose Image quality and Video quality (defaults 1K and 720p).
Click Save changes in the top-right corner.
Troubleshooting
| The AI says or you see | Cause | Fix |
|---|---|---|
| Missing or invalid Mark Flow MCP token… | The token is wrong, missing, revoked or expired. | Create a new token, paste it into the configuration again and restart the AI app. |
| MCP is not included in this account's Mark Flow plan. | The account does not have the Pro plan. | Upgrade to Pro or Agency. |
| Mark Flow is not connected… or Mark Flow did not pick up the command… | Chrome or the side panel is closed, or the side panel is signed in with a different account than the one that created the token. | Open Chrome, press Alt+S to open the side panel, sign in with the right account and ask the AI to try again. |
| Mark Flow stopped responding while running the command… | The browser was closed or the side panel reloaded midway. | Open it again and ask the AI to run the command again. |
| Chưa mở Google Flow hoặc chưa vào 1 project… or Chưa mở tab Google Flow. | No Flow tab is open, or the Flow tab is not inside a project. | Open Google Flow and enter (or create) a project, or ask the AI to create one. |
| Vui lòng đăng nhập ChatGPT. (or Grok) | You are not signed in on that site. | Sign in on the ChatGPT or Grok tab and try again. |
| PromptQueue chưa sẵn sàng (cần bật pipeline queue). | Mark Flow 3.70.7 or older, with neither the Flow API nor Run queue in batches on. | Turn one of them on (see Before you start) and click Save changes. |
| Claude does not show the markflow tools or reports a connection error | A typo in the configuration file, Node.js missing, or Claude not fully quit. | Redo the Claude Desktop steps one by one. On Windows, see the note below. |
Older versions of Mark Flow show a configuration in Settings with Authorization:Bearer TOKEN directly in args. On Windows, Claude Desktop can split that apart because of the space, and you get a token error. Use the configuration in this guide instead: the token sits in the env part, so it works on every computer.
Other Google Flow errors (out of generations, content refused…) are explained in Troubleshooting.
Still stuck? See Troubleshooting or email admin.markflow@gmail.com with your Mark Flow version, the AI platform and the exact error message.