All guides
- 1. Install and get started
- 2. Batch images and videos on Google Flow
- 3. Auto download and history
- 4. Remove logos from images and videos
- 5. Install Mark Bridge and turn on the Flow API
- 6. Build and run workflows
- 7. Use ChatGPT, Gemini, Grok and Muse
- 8. Prompt and creative tools
- 9. Plans, upgrades and payment
- 10. Control Mark Flow with an AI agent (MCP)
- 11. Mark Flow settings: what each option does
- 12. Troubleshooting
Guide › 5
Install Mark Bridge and turn on the Flow API
Install Mark Bridge in Chrome by hand, check that it is ready, choose between Drive the tab and Flow API, update to a new version and fix the common status messages.
What Mark Bridge is and when you need it
Mark Bridge is a second extension that runs next to Mark Flow. It does two jobs: it calls the Flow API directly (the fastest way to run Google Flow) and it removes logos from images and videos. Mark Bridge is not on the Chrome Web Store, so you install it by hand once, following this guide.
| You want to | Need Mark Bridge? |
|---|---|
| Run Google Flow in Flow API mode (Pro plan) | Yes |
| Use the Remove logo tab or remove logos on download | Yes |
| Run Google Flow by driving the tab (Mark Flow types and clicks on the Flow page for you) | No |
Mark Bridge only accepts commands from Mark Flow and only talks to the Mark Flow server. It has no toolbar button and no window of its own; you only see it on the chrome://extensions page.
Download and unzip Mark Bridge
Open the Download Mark Bridge page and click Download Mark Bridge (the button includes the version number). Chrome downloads a
.zipfile, usually into your Downloads folder.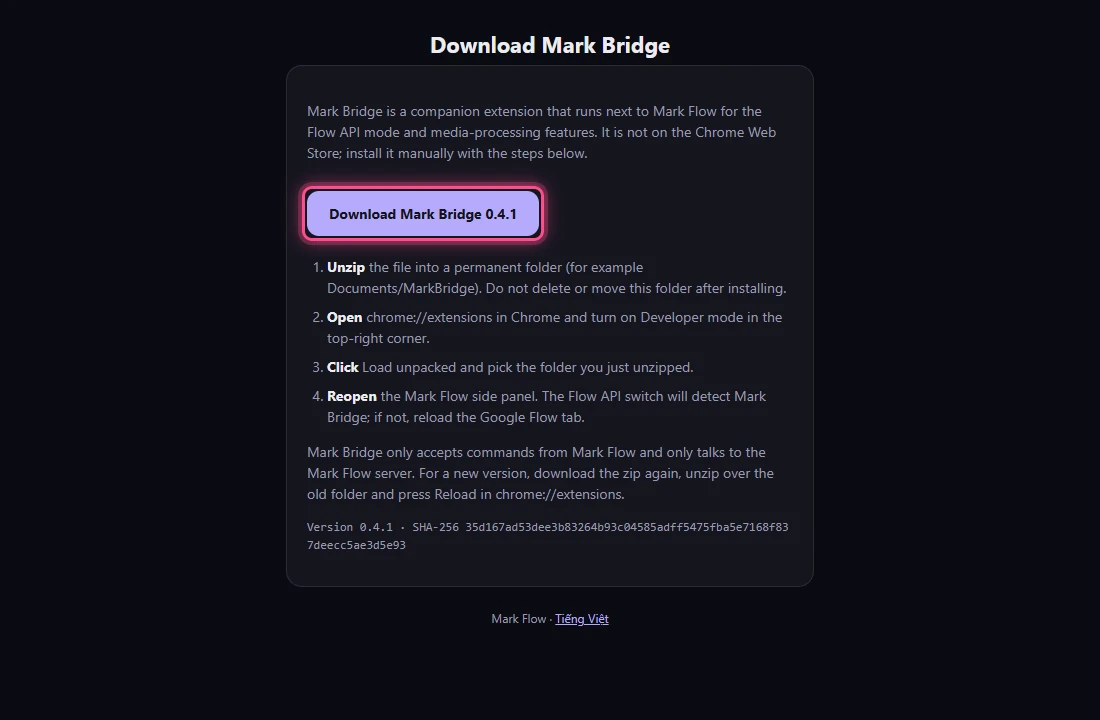
The Download Mark Bridge page on markflow.net. Create a permanent folder for Mark Bridge, for example a
MarkBridgefolder inside Documents.Unzip. On Windows: right-click the zip file → Extract All… → click Browse and pick the folder you just created → click Extract. On a Mac: double-click the zip file, then move the unzipped folder to its permanent place.
Open the unzipped folder and check it: you must see a
manifest.jsonfile (Windows may show justmanifest) along with theapi,assetsandvendorfolders. This is the folder you will pick in the next part.
Do not delete, rename or move this folder after installing: Chrome runs Mark Bridge straight from it. Do not leave it in Downloads or a temporary (Temp) folder if you or a cleaner app empty those regularly. If the folder disappears, Mark Bridge stops working.
Load Mark Bridge into Chrome
Type
chrome://extensionsin the address bar and press Enter. The Extensions page opens.Turn on the Developer mode switch in the top-right corner. A new row of buttons appears in the top-left corner.

The switch is in the top-right corner. Click Load unpacked.
In the folder picker, go to the folder that contains
manifest.jsonfrom the check above, select it and click Select Folder (on a Mac, Select).A Mark Bridge card with its version number appears in the list, and the switch in its bottom-right corner is on (blue). The installation is done.
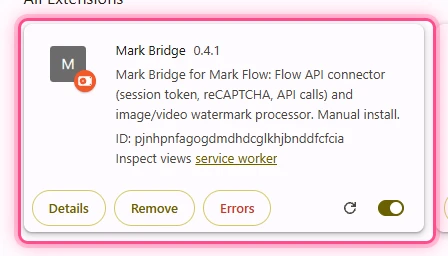
Mark Bridge after a successful load.
The most common mistake: picking the parent folder (the folder that contains the Mark Bridge folder, or the whole Downloads folder), or only double-clicking the zip without unzipping it. Chrome then reports that the manifest file is missing or unreadable. Fix: unzip, then pick the folder that has manifest.json directly inside it.
When Chrome starts, it may show a notice that you are running extensions in developer mode and offer to turn them off. This is normal for extensions installed by hand. Just close the notice; do not turn Mark Bridge off.
Check the connection in Settings
Open a Google Flow tab and sign in with the Google account you use for Flow.
In the Mark Flow side panel (the panel on the right edge of the browser; press
Alt+Sto open it), click the gear icon in the top-right corner → Settings. The Settings window opens.In the left menu, choose Mark Bridge & Flow API.
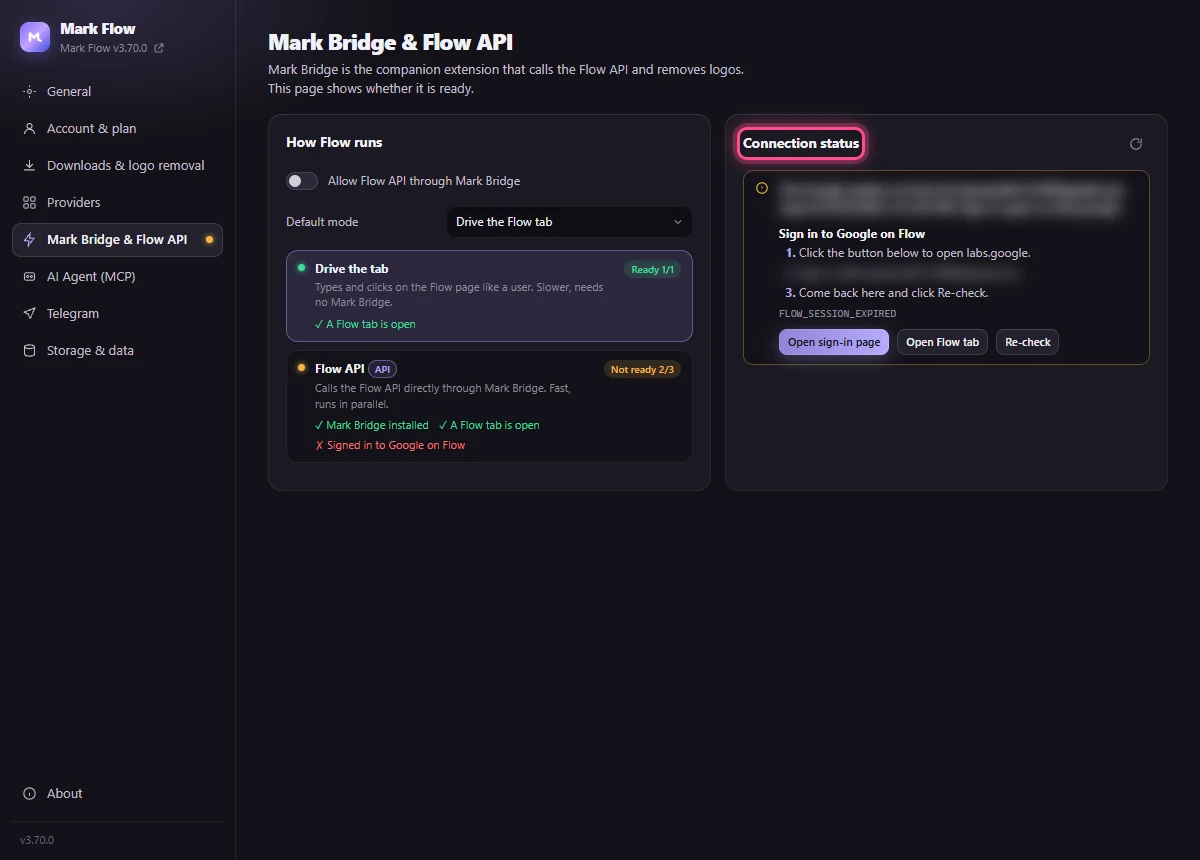
An example with one step missing: the ✗ line tells you what is missing and the Connection status card on the right tells you how to fix it. Look at the Connection status card on the right. If it says Mark Bridge … is ready (with the version number), you are done. If not, read the message in the card, follow the table at the end of this guide, then click Re-check (or the circular arrow in the card's corner). The page also re-checks by itself about every 5 seconds.
The dot next to Mark Bridge & Flow API in the left menu gives a quick hint: green means ready, amber means installed but not ready, grey means not installed.
If you only use Mark Bridge to remove logos, you do not need the ready state: having Mark Bridge installed and switched on is enough. The ready state matters for the Flow API.
Choose how Flow runs: Drive the tab or Flow API
The How Flow runs card on the left of the page has these items.
- Allow Flow API through Mark Bridge: the main switch. When it is off, Mark Flow always runs Flow by driving the tab.
- Default mode: Drive the Flow tab, Auto (API when ready) or Flow API (fastest). Auto uses the Flow API when every condition is met.
- Two mode cards, Drive the tab and Flow API. Click a card to pick that mode. Each card lists its conditions, with ✓ for met and ✗ for missing, and a badge such as Ready 3/3 or Not ready 1/3.
| Condition | Meaning | If it shows ✗ |
|---|---|---|
| A Flow tab is open | At least one Google Flow tab is open. | Open a Flow tab (the Open Flow tab button in the status card). |
| Mark Bridge installed | Mark Flow can talk to Mark Bridge. | Install it as above, or switch Mark Bridge back on in chrome://extensions. |
| Signed in to Google on Flow | Mark Bridge has picked up the sign-in session of the Flow tab. | Sign in to Google on the Flow tab, reload the tab, then click Re-check. |
| Drive the tab | Flow API | |
|---|---|---|
| How it works | Types and clicks on the Flow page like a user | Calls the Flow API directly through Mark Bridge |
| Speed | Slower | Fast, can run in parallel |
| Needs Mark Bridge | No | Yes |
| Mark Flow plan | Every plan, including Free | Pro, Agency |
| Needs an open, signed-in Flow tab | Yes | Yes |
On the Free plan the page shows Flow API requires the Pro plan. with an Upgrade button, and Default mode is hidden. Install Mark Bridge anyway if you want to remove logos. See Plans and billing.
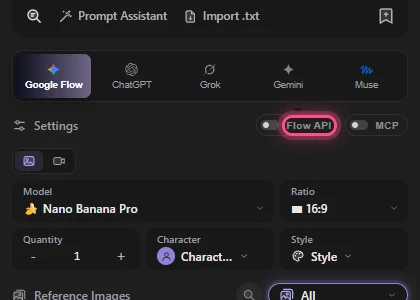
After changing the switch or the mode, click Save changes in the top-right corner. The Flow API switch in the Gen tab (next to Settings) is the same setting: turning it on there switches to the Flow API, turning it off goes back to driving the tab. Next to it a short word shows the status (Connected, Bridge missing, Flow tab closed, Sign in needed, Session expired, Waiting for Flow, Off), plus a Reconnect Flow API refresh button.
Update Mark Bridge
When Mark Flow needs a newer version, the Connection status card says Mark Bridge … is outdated, … or newer is required. Download and reload it. with a Download Mark Bridge button. To update:
Download the new zip from the Download Mark Bridge page.
Unzip it over the same old folder. When Windows asks about existing files, choose Replace the files in the destination.
Open
chrome://extensionsand click the circular arrow (Reload) on the Mark Bridge card.Reload the Google Flow tab, then go to Settings › Mark Bridge & Flow API and click Re-check. The new version number appears in the Mark Bridge … is ready line.
Common messages and fixes
| Message | Fix |
|---|---|
| Mark Bridge was not found. Install it with the steps below. or Mark Bridge is not installed. | Install it with this guide. If it is already installed, check that the Mark Bridge card in chrome://extensions is switched on and that its folder still exists, then click Re-check. |
| No Flow tab is open. | Click Open Flow tab or open Google Flow yourself, then click Re-check. |
| The Google session on Flow … expired … Sign in again on labs.google. | Click Open sign-in page, sign in with that same Google account, come back and click Re-check. |
| Not signed in to Google on Flow. | Sign in to Google on the Flow tab, then click Re-check. |
| A Flow tab is open but no token was issued yet. Reload the Flow tab and re-check. | Reload the Flow tab (F5), wait for it to finish loading, then click Re-check. |
| Mark Bridge … is outdated, … or newer is required. | Follow Update Mark Bridge above. |
| While running, a message that Flow API mode needs Mark Bridge | Install Mark Bridge, or turn off the Flow API switch to run by driving the tab. |
Other Flow API errors while running (content refused, out of generations…) are explained in Troubleshooting.
Still stuck? See Troubleshooting or email admin.markflow@gmail.com with your Mark Flow version, the AI platform and the exact error message.