All guides
- 1. Install and get started
- 2. Batch images and videos on Google Flow
- 3. Auto download and history
- 4. Remove logos from images and videos
- 5. Install Mark Bridge and turn on the Flow API
- 6. Build and run workflows
- 7. Use ChatGPT, Gemini, Grok and Muse
- 8. Prompt and creative tools
- 9. Plans, upgrades and payment
- 10. Control Mark Flow with an AI agent (MCP)
- 11. Mark Flow settings: what each option does
- 12. Troubleshooting
Guide › 6
Build and run workflows
Chain several image and video steps into one pipeline that runs on its own: start from a template or build your own with nodes, then run, monitor and manage your workflows.
What is a workflow?
A workflow is a chain of steps that Mark Flow runs one after another, so you don't have to click through each step yourself. Example: take a sample image → have Gemini redraw it as a product shot → send that image to Google Flow to make a video → download the video automatically. You build the chain once; after that you just press run.
- Node: one box on the canvas. Each node does one job: create an image, create a video, wait, download…
- Port: the small dots on the edges of a node. Dots on the left are inputs, dots on the right are outputs. The dot colour shows the kind of data: text (Text), image (Image), video (Video), video frame (Frame) or anything (Any).
- Connection: the line from one node's output to another node's input. The result of the first node travels along the line to the next one.
The example above is 4 nodes in a row: Image (sample picture) → Gemini (create an image) → Generate Image/Video set to video (Google Flow makes a video from the image) → Download (save it).
Before you start
- Sign in to your Mark Flow account (the person icon at the top right of the side panel). You cannot create workflows while signed out.
- Keep a Google Flow tab open and signed in to Google. In the project bar at the top of the side panel, pick the right Flow project: a workflow belongs to the project selected when you create it.
- If the workflow uses ChatGPT, Gemini, Grok, Muse or AI Agent nodes, you need the Pro plan and must already be signed in to those sites in the same Chrome. See Use ChatGPT, Gemini, Grok and Muse.
Free plan: 1 workflow, 1 run per day, up to 5 nodes per workflow, no import/export, no Templates tab. ChatGPT, Gemini, Grok, Muse, AI Agent and Download nodes need Pro (you can add and edit them, but they will not run). The Runs and Nodes counters at the top of the editor show how much you have used. See Plans and billing.
Start from a template
A template is a ready-made workflow. Using one is the quickest way to get a working workflow, which you can then adjust.
Open the side panel (the panel on the right edge of the browser, shortcut
Alt+S) and click the Workflow tab.Click the Templates sub-tab. Type in Search templates... or pick a category to filter the list.
On the template you want, click Use template. The Use template dialog says the template will be copied into a new workflow in your account.
Click Use template in that dialog. Mark Flow switches to the Workflows sub-tab and opens the copy in the editor so you can edit it.
The Templates tab needs the Pro plan; on Free you will see Feature Locked. The template list changes over time: if the tab says No templates found, build your own workflow as described below.
Build your own workflow
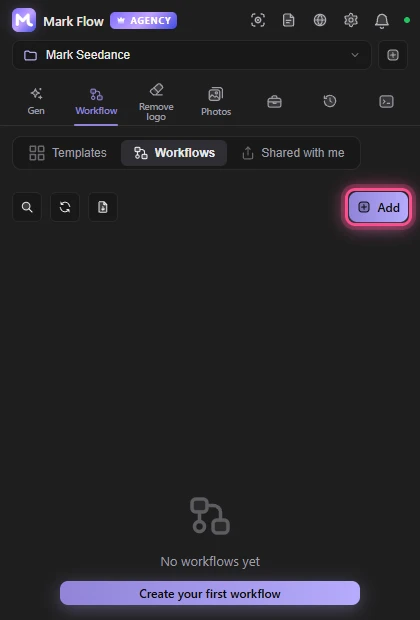
In the Workflow tab, open the Workflows sub-tab and click Add at the top right. If you have no workflows yet, click Create your first workflow.
The workflow editor opens in its own window. The empty canvas shows Your canvas is ready with 5 suggestion cards (Prompt, Image, Video, AI, Download). Click a card to add your first node, or click Add another node.
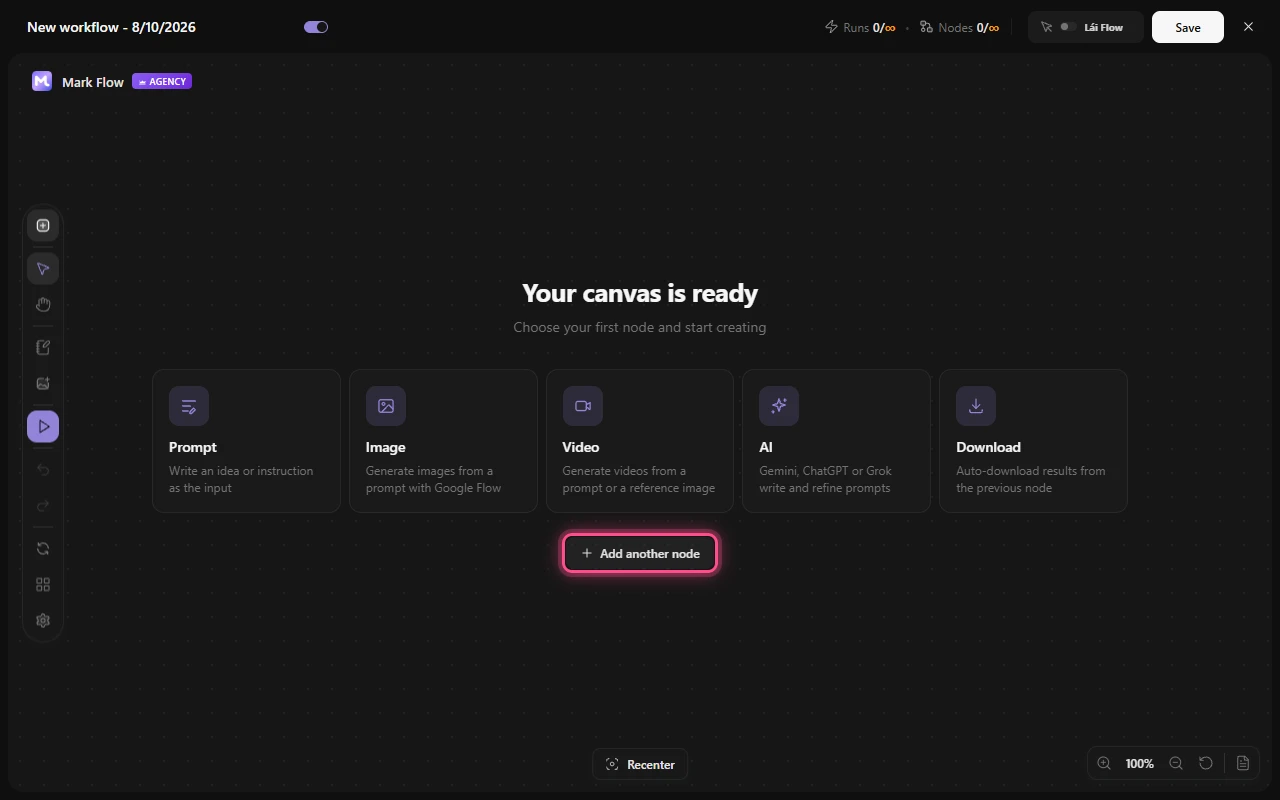
Type a name into the Workflow name box at the top left.
Add a node: click the + button (Add node (N)) on the vertical toolbar on the left, press
N, or right-click an empty spot on the canvas. The node picker opens: type in Search node..., use the arrow keys and pressEnter.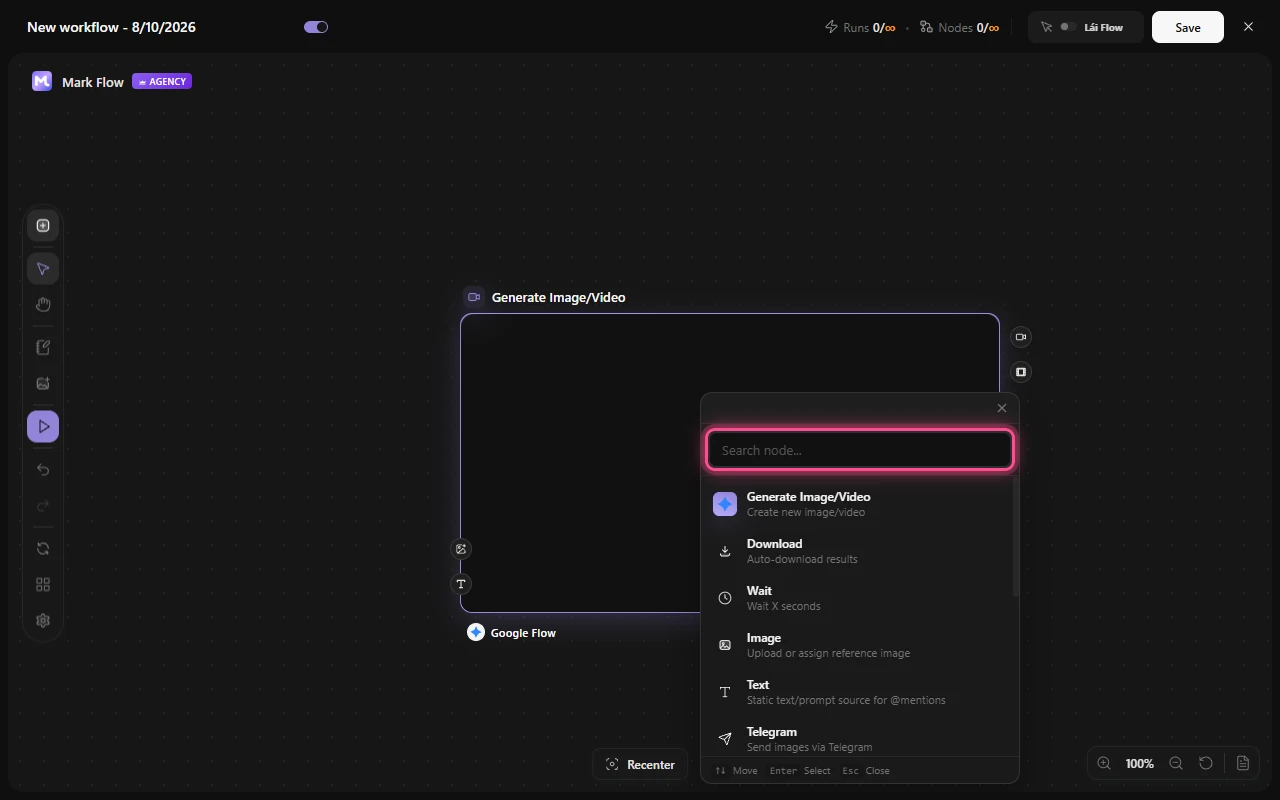
Connect nodes: press on the dot on the right side of the first node, drag to the dot on the left side of the next node and release. Tip: click (don't drag) an empty dot and the picker shows only nodes that fit that port (Suggested for port); the new node is connected for you.
Configure a node: click it and the panel on the right opens the Config tab, where you enter the prompt, pick the model, aspect ratio, quantity and so on. The Results tab shows the output after a run.
Save: click the save button at the top right (Save) or press
Ctrl+S. The run button only appears once the workflow has been saved for the first time.
A Text node holds a piece of text you reuse. In another node's prompt, type @ followed by the Text node's slug (shown in the Slug box on the Config tab) to insert that text.
Node types and connections
Node names are shown in English, exactly as in the node picker. The In and Out columns show the data type of the ports.
| Node | What it does | In | Out |
|---|---|---|---|
| Generate Image/Video | Creates an image or video on Google Flow | Image (reference images), Text (prompt); video mode adds Frame or Video depending on the mode | Image or video; videos also give a Frame (last frame) |
| Image | Uploads or picks one reference image | — | Image |
| Text | Fixed text, inserted into other nodes with @slug | — | Text |
| AI Agent | Uses ChatGPT or Gemini to work on text: rewrite prompts, write scripts, translate, summarise. With AI off it passes the text through as is | Text (optionally Image) | Text |
| Text Extract | Pulls part of the previous node's text (by marker, JSON key or regex) | Text | Text |
| ChatGPT | Creates images on ChatGPT | Image, Text | Image |
| Gemini | Creates images or videos on Gemini | Image, Text | Image or video |
| Grok | Creates images or videos on Grok | Image, Text | Image or video; videos also give a Frame |
| Muse | Creates images or videos on Muse | Text | Image or video |
| Wait | Waits a number of seconds, then passes things on | Any | Any |
| Download | Saves the previous node's results to your computer | Any | — |
| Note | A note on the canvas; it does not run | — | — |
- A Text output connects to Text inputs.
- An Image output connects to Image or Frame inputs.
- A Video output connects to Video inputs.
- A Frame output connects to Frame or Image inputs.
- Any (grey) connects to every type, as an output and as an input.
Notes, layout and right-click menus
- Add note frame on the vertical toolbar: creates a note frame to group nodes. Right-click the frame → Run this group to run only the nodes inside it.
- Auto layout: tidies the nodes up in running order.
- Undo (Ctrl+Z) and Redo (Ctrl+Shift+Z): step back or forward through your edits.
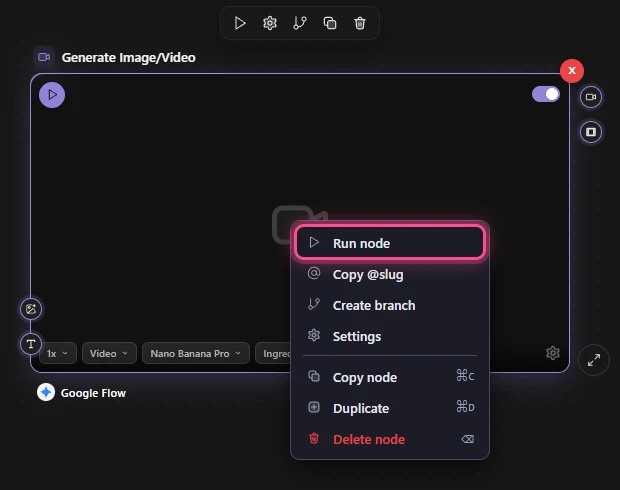
- Right-click a node: Run node (run only this node), Reset node (clear its results; shown once the node has run), Copy prompt, Create branch (add a new node after this one), Settings, Duplicate, Delete node.
- The Workflow settings gear on the vertical toolbar: set Delay between nodes, Timeout per node, Run parallel nodes at the same level, Stop on error and Retry on error (Pro), then click Save settings.
Run, stop and monitor
Check that the Google Flow tab is open and the side panel's project bar shows the workflow's project.
In the editor, click the run button Run (Ctrl+Enter) on the vertical toolbar, or press
Ctrl+Enter.If part of the workflow already finished earlier, the Continue or re-run? dialog appears: Continue runs the unfinished nodes, Re-run starts again from the beginning.
The AI Provider Status dialog lists the platforms the workflow uses. If one says Tab not opened, click Open next to it and wait until it shows Ready. If the workflow has Google Flow nodes, the dialog also has Submit mode: Auto submit or Manual Submit.
Click Run (the button says Run Anyway while a platform is not ready).
Monitor: click the Logs and progress icon at the bottom of the canvas to open Execution progress, with a progress bar and a log of each step.
To stop part-way, click Stop (it replaces the run button while the workflow runs).
While a workflow runs, don't close or type into the Google Flow tab or the ChatGPT, Gemini, Grok or Muse tabs it is using: Mark Flow is driving those tabs.
Manage your workflows
- Each workflow is a card in the Workflows sub-tab, grouped by Flow project. The switch on the card turns the workflow on or off; the ⋯ button opens Edit, Run, Reset, Duplicate, Export, Delete.
- Run all: runs, one after another, every workflow that is on, not yet completed and belongs to the selected Flow project. Completed workflows are skipped; Reset them first to run them again. While running, the button becomes Stop All.
- Filter by project: the dropdown next to Run all, to see only one project's workflows.
- Import and export (Pro): Export workflow in the editor (or Export in the ⋯ menu) saves the workflow as a
.jsonfile; Import workflow from file on the Workflows toolbar loads it back.
Common problems
- Limit reached or Workflow runs exhausted: the Free plan has 1 workflow and 1 run per day. Wait for the next day or upgrade.
- A node says it needs Pro (crown icon): you can edit it, but it only runs on a Pro account.
- Flow project not ready…: open the Google Flow tab, pick the right project in the project bar, then run again.
- Save the workflow before running.: save (
Ctrl+S) and run again. - No workflows to run… after Run all: the workflows are off or already completed. Turn them on or Reset them.
For other errors, see Troubleshooting.
Still stuck? See Troubleshooting or email admin.markflow@gmail.com with your Mark Flow version, the AI platform and the exact error message.