All guides
- 1. Install and get started
- 2. Batch images and videos on Google Flow
- 3. Auto download and history
- 4. Remove logos from images and videos
- 5. Install Mark Bridge and turn on the Flow API
- 6. Build and run workflows
- 7. Use ChatGPT, Gemini, Grok and Muse
- 8. Prompt and creative tools
- 9. Plans, upgrades and payment
- 10. Control Mark Flow with an AI agent (MCP)
- 11. Mark Flow settings: what each option does
- 12. Troubleshooting
Guide › 3
Auto download and history
Let Mark Flow save images and videos into the right folder with easy-to-find file names, then look up every run in the History tab.
What you need
- A Pro or Agency plan, signed in. On Free, the Auto download switch is locked and shows a crown; you can still download by hand on the Google Flow page.
- The one-time Chrome setting in the next section.
- To remove logos as files download: Mark Bridge installed as well.
Compare the plans in Plans and billing.
One-time Chrome setting
Chrome has an option to ask where to save every file. When it is on, each file Mark Flow downloads opens a save dialog: a 20-prompt run means dozens of clicks, and the folder and file name Mark Flow chose may be replaced. Turn it off.
In the side panel, click the gear icon at the top right and choose Settings. The Settings window opens separately.
In the left menu, choose Downloads & logo removal.
In the One-time setup box, click Open Chrome download settings. The
chrome://settings/downloadspage opens.Turn off Ask where to save each file before downloading.
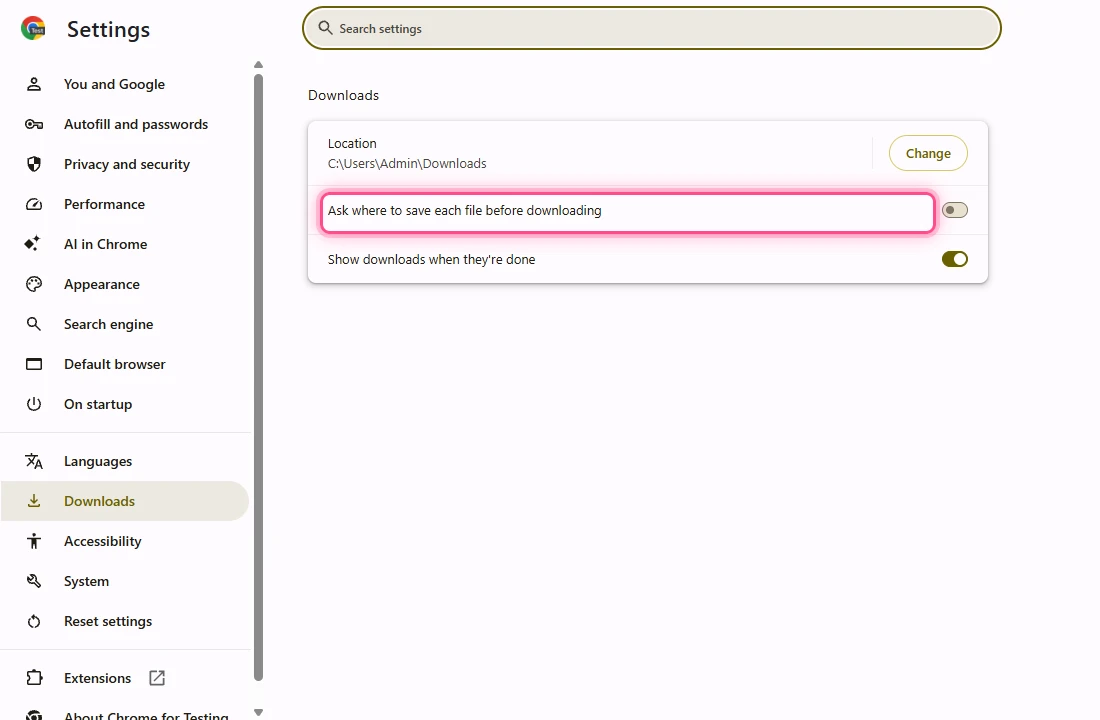
Back in the Settings window, click Open extensions list and turn off any other extension that downloads or renames files automatically, so they do not fight with Mark Flow.
In this guide Downloads means Chrome's download folder. If you changed that location in chrome://settings/downloads, files go into the folder you chose.
Turn on auto download in the Gen tab
Open the Gen tab, scroll below Reference Images and turn on Auto download.
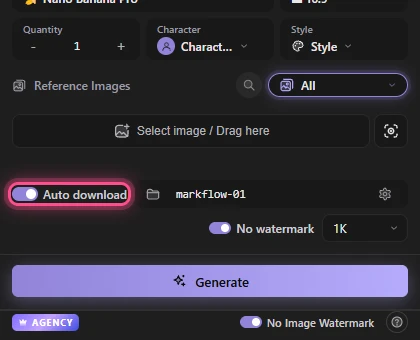
The box next to it is the sub-folder for these runs,
markflow-01by default. Change it to something memorable, such asoctober-ads. Leave it empty to save straight into the main folder.Choose the download quality: images 1K, 2K or 4K; videos 720p, 1080p or 4K. Higher quality means bigger files and slower downloads.
Click Generate as usual. In Confirm Run, the Download box shows the quality you chose. Pick No if you do not want this run downloaded.
For ChatGPT, Gemini and Grok, Mark Flow saves the exact file the site returns, so there is no quality box.
The Auto download switch in Settings is only the starting value. Once you switch it on or off in the Gen tab, the Gen tab remembers its own choice.
Set the folder and file names
The main folder and the file name template live in Settings › Downloads & logo removal, in the Auto download card:
- Folder: the main folder inside
Downloads,markflow_outputby default. - Project name: the text that fills the
[Project]variable, for exampleCuteCats. Leave it empty to drop that part. - File name template:
[Date]_[Project]_[Prompt]_[Index]by default. - Image quality, Video quality: the preset for the quality box in the Gen tab.
When you are done, click Save changes at the top right of the window. Variables you can use in the template:
| Variable | Replaced with | Example |
|---|---|---|
[Date] | Creation date, year-month-day | 2026-10-07 |
[Time] | Creation time, hours-minutes-seconds | 14-05-09 |
[Project] | The text in Project name (up to 30 characters) | CuteCats |
[Prompt] | The first 40 characters of the prompt, accents removed | A_kitten_sitting_on_a_sofa |
[Index] | The result number, 3 digits | 001 |
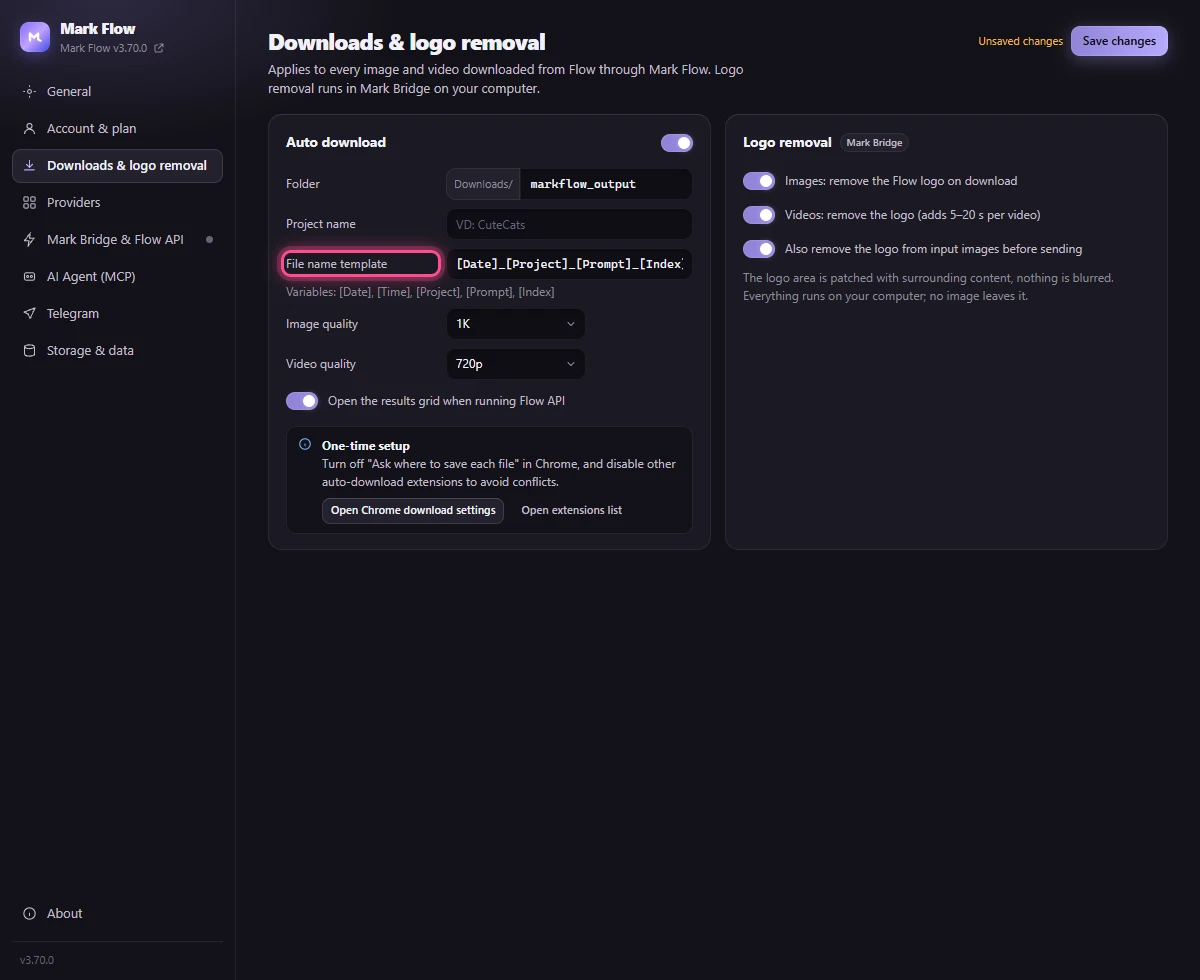
A full example: Folder is markflow_output, the Gen tab sub-folder is markflow-01, Project name is CuteCats, the default template, and the prompt “A kitten sitting on a sofa”. The first result is saved as:
Downloads/markflow_output/markflow-01/2026-10-07_CuteCats_A_kitten_sitting_on_a_sofa_001, plus the image or video file extension (for example .mp4 for a video).
Mark Flow strips Vietnamese accents and turns spaces and unusual characters into _ so names work on every computer. [Date] uses universal time (UTC), so in Vietnam a file made before 7 a.m. carries the previous day's date.
To find files quickly, type chrome://downloads in the address bar, then click a file name or open the folder that holds it.
Look things up in the History tab
Every run is recorded in the History tab (the clock icon in the tab row). When you are signed in, history is stored with your account; when you are not, only the latest 200 records are kept on this computer.
Click the History icon. Each row shows a thumbnail, the start of the prompt, the type (image or video), the provider, the time and the project name.
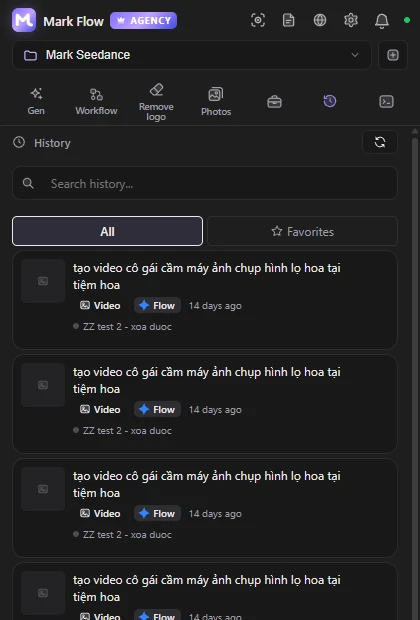
Type a few words of a prompt in Search history... to filter. It filters the records currently shown; click Load more at the bottom of the list to bring in older ones.
Click the star to mark a record as a favorite. Use the Favorites filter at the top to see only starred records, All to see everything again.
Click Re-run (the circular arrow) to put the record's prompt, type, model, ratio and count back into the Gen tab. Check them, then click Generate.
Click the bin (Delete) and confirm to remove a record.
Deleting from History only removes the record. Files already downloaded and the images or videos on Google Flow stay. Records tagged MCP were made by an AI agent through the MCP connection (see AI Agent).
Remove the logo while downloading
The Pro plan can remove the Flow logo as files download. The removal runs on your computer through the Mark Bridge extension, so install Mark Bridge first. There are three places to switch it on:
- Settings › Downloads & logo removal › Logo removal card: Images: remove the Flow logo on download, Videos: remove the logo (adds 5–20 s per video) and Also remove the logo from input images before sending. This is the global setting.
- The side panel footer: the No Image Watermark and Video switches, a shortcut to that same global setting.
- The Gen tab: the No watermark switch in the Auto download row, which only changes runs from the Gen tab.
If no logo is found in the bottom-right corner, Mark Flow keeps the original and the file is not damaged. Removing logos from files already on your computer is covered in Remove logo.
Common problems
- Chrome still asks where to save each file: the option in One-time Chrome setting is still on.
- Nothing is downloaded: check that Auto download is on, that Download in Confirm Run is not No, and that your account is on Pro.
- Files land in the wrong place: check Chrome's download folder, the Folder field in Settings and the sub-folder in the Gen tab, then turn off other download extensions.
- A greyed-out switch with a crown: the feature needs Pro. See Plans and billing.
- Anything else: see Troubleshooting.
Still stuck? See Troubleshooting or email admin.markflow@gmail.com with your Mark Flow version, the AI platform and the exact error message.