All guides
- 1. Install and get started
- 2. Batch images and videos on Google Flow
- 3. Auto download and history
- 4. Remove logos from images and videos
- 5. Install Mark Bridge and turn on the Flow API
- 6. Build and run workflows
- 7. Use ChatGPT, Gemini, Grok and Muse
- 8. Prompt and creative tools
- 9. Plans, upgrades and payment
- 10. Control Mark Flow with an AI agent (MCP)
- 11. Mark Flow settings: what each option does
- 12. Troubleshooting
Guide › 2
Batch images and videos on Google Flow
Run many prompts in one go on Google Flow from the Gen tab: pick a project, model, ratio and reference images, then follow progress and retry failed prompts.
What you need
- Mark Flow installed and the side panel open (see Install and get started).
- A Google Flow tab signed in to a Google account with credits left.
- Only one Flow tab open. Several Flow tabs at once can make Mark Flow send to the wrong place.
- The Free plan runs up to 4 prompts per run. For more, see Plans and billing.
A prompt is the text that describes the image or video you want, for example “a kitten sitting on a sofa, morning light”. Mark Flow types each prompt into Google Flow for you, exactly as you would.
Step 1: Open Flow and pick a project
Open the Google Flow tab and sign in. If you are not signed in, the side panel shows Sign in to Google Flow with an Open Google Flow button.
Open the side panel (
Alt+S), choose the Gen tab, then click the Google Flow provider button.If the Flow tab is on its home page, the side panel shows a Select project box. Click the project you want; the Flow tab opens it.
For a new project, click Create new project in that box, or the + button next to the project name at the top of the side panel.
Every image and video of the run goes into the selected project. Check the project name in the bar just below the side panel header before you run.
Step 2: Enter several prompts
In the Gen tab, turn on the Multi-Prompt switch at the right of the Prompt box.
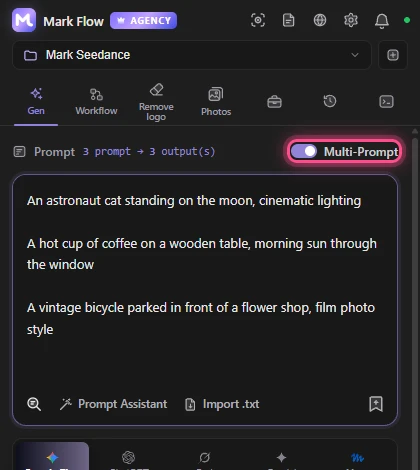
Type or paste your prompts. Leave one blank line between two prompts (press Enter twice).
Check the counter next to Prompt to make sure Mark Flow counted the right number of prompts.
| You type | Mark Flow reads it as |
|---|---|
kitten on a sofa, a blank line, then puppy on the grass | 2 prompts |
kitten on a sofa, a line break (no blank line), morning sunlight | 1 prompt over two lines |
| Several prompts separated by blank lines, but Multi-Prompt is off | 1 single prompt with the whole box |
Already have a list in a file? Click Import .txt and pick a .txt or .csv file, or drag the file onto the prompt box. In the file each line is one prompt; empty lines and lines starting with # are skipped. The prompts are added to the end of the box and Multi-Prompt turns on by itself.
Every time you reopen the side panel, Multi-Prompt switches off. Turn it back on before a new batch.
Step 3: Choose image or video, model, ratio and count
The Settings block sits just below the provider buttons. Work through it from left to right:
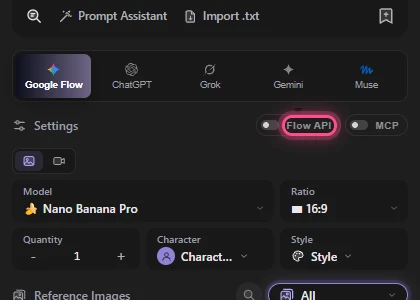
| Control | Meaning | Options |
|---|---|---|
| The image and video icons | Choose images or videos. Hover over an icon to see Generate images or Generate videos | Image or video |
| Model | The Google AI model that makes the result | Images: Nano Banana Pro (default), Nano Banana 2.1, Nano Banana 2 Lite. Videos: Omni 1.1 Flash (default), Veo 3.1 Lite, Veo 3.1 Fast, Veo 3.1 Quality |
| Ratio | Aspect ratio, width compared with height. 16:9 is landscape, 9:16 is portrait, 1:1 is square | Images: 16:9, 4:3, 1:1, 3:4, 9:16. Videos: 16:9, 9:16 |
| The − and + buttons | How many results Flow makes per prompt | 1 to 4 |
| Style | A style description appended to every prompt | Optional, see Prompt tools |
Mark Flow updates the model list to match Google Flow, so it can change. If your Google Flow plan does not include a model, Flow refuses it.
When you pick video, the Settings block adds:
- Ingredients or Frames. Ingredients builds the video from the prompt, optionally with reference images. Frames builds a video that moves from a Start image to an End image: a Video Frames section appears, and you click Add in each slot to choose an image.
- Video length: 4, 6 or 8 seconds. Omni 1.1 Flash adds 10 seconds.
- Generation resolution for Omni 1.1 Flash: 360p or 720p.
- Random voice: choose a voice for the video. Character (also available for images) picks a character from Flow. Veo 3.1 Quality supports neither voice nor character.
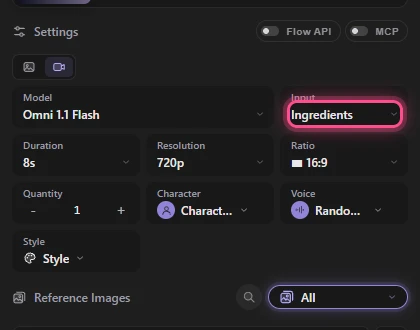
Flow forces the length for some combinations: Veo 3.1 Lite or Fast with Ingredients and a reference image only makes 8 seconds; Omni 1.1 Flash with a reference video only makes 10 seconds. Mark Flow then says “This model only produces …; generated … instead of …”.
Step 4: Add reference images (optional)
Reference images help Flow keep the right character, product or layout. In Frames mode, use the Video Frames section instead of this one.
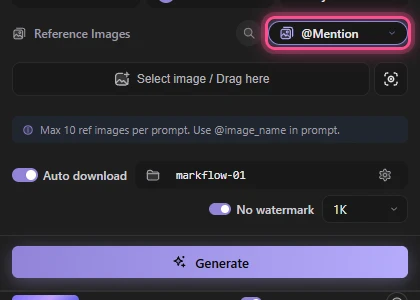
In Reference Images, click Select image / Drag here, or drag images from your computer onto it.
In the image picker, click Select from computer, or pick images you already have in an album or on Flow, then click Confirm.
Wait for the upload to Flow to finish. Meanwhile the generate button shows Uploading images... and cannot be clicked.
Choose how the images are used in the box to the right of the Reference Images title (see the table below).
| Mode | How it works |
|---|---|
| All | Every prompt uses all images |
| @Mention | Each image gets a name (the Image name: row). A prompt that writes @name uses that image. For names with spaces, write @[image name] |
| Sequential | Prompt 1 uses image 1, prompt 2 uses image 2, and so on |
| None | Keeps the images in the list without sending them |
The maximum number of references depends on the model: up to 10 for images; Omni 1.1 Flash 7 images and 1 video; Veo 3.1 Lite and Fast 3 images; Veo 3.1 Quality 2 images, and no reference images at all in Ingredients mode.
Step 5: Run and follow progress
Click Generate at the bottom of the Gen tab. The Confirm Run box opens.
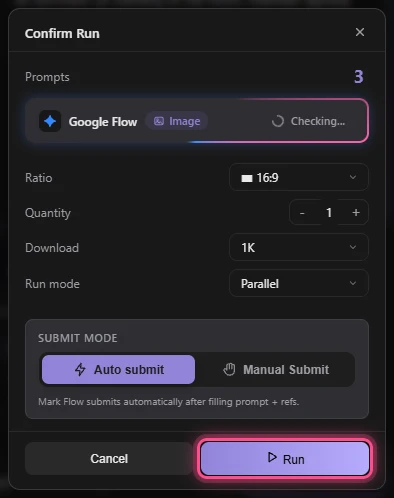
Read the status line: Google Flow with Ready is good. If it says Tab not opened, open the Flow tab first.
Check Prompts (the prompt count), Ratio, Quantity and Download. Pick No under Download if you do not want automatic downloads; auto download needs Pro.
With several prompts, choose a Run mode: Parallel keeps submitting without waiting for results, so it is faster; Sequential waits for each prompt to finish before sending the next.
Choose a Submit mode: Auto submit lets Mark Flow press submit; Manual Submit makes Mark Flow only fill in the prompt and images while you press Enter on the Flow page for each one. Manual submitting makes Google less likely to suspect automation.
Click Run. Mark Flow starts filling in and submitting each prompt in the Flow tab.
Follow progress in two places:
- On the Google Flow page: Mark Flow's tracker floats at the bottom right and shows how many prompts were sent, failed and in total, plus the status of each prompt. It has Pause, Resume, Stop and Stop all buttons.
- In the side panel: click the Logs icon, then Queue, to see what is waiting, being sent or done. The Logs sub-tab next to it records every step in detail.
While a run is going, do not close or reload the Flow tab, and do not type in Flow's prompt box. Mark Flow is working on that very page.
Retrying failed prompts: when prompts fail, the Gen tab shows a Failed prompts section with the reason for each one. Click Retry all to put them back in the Prompt box, edit them if needed, then click Generate again. Click Clear list if you no longer need them. The Pro plan adds Auto retry, which resubmits failed prompts without a click.
Tab control or Flow API
Mark Flow can drive Google Flow in one of two ways:
| Mode | How it works | What it needs |
|---|---|---|
| Drive the tab (default) | Types and clicks on the Flow page like a real user. Slower | A signed-in Flow tab. Works on every plan |
| Flow API | Calls Flow's API directly through the Mark Bridge extension. Fast and can run in parallel | Pro plan, Mark Bridge installed, a signed-in Flow tab |
Turn it on with the Flow API switch to the right of Settings in the Gen tab. The Connected label means it is ready; in this mode the Confirm Run box no longer shows Submit mode. How to install Mark Bridge and what the other labels mean is in Mark Bridge and Flow API.
Common problems
- A warning (currently in Vietnamese) starting “Gói của bạn giới hạn 4 prompt/batch…”: the Free plan runs 4 prompts at a time. Split your list into several runs, or upgrade.
- The side panel only shows Google Flow tab not open: no Flow tab is open. Click Open Google Flow.
- The whole box was sent as one prompt: Multi-Prompt was off, or blank lines were missing between prompts.
- A yellow bar warns about several Flow tabs: click Close other tabs to keep just one.
- Results ended up in the wrong project: check the project name at the top of the side panel before you run.
- Flow refuses a prompt, runs out of credits or blocks you for a while: see Troubleshooting.
Still stuck? See Troubleshooting or email admin.markflow@gmail.com with your Mark Flow version, the AI platform and the exact error message.